One of the most annoying things about high pixel density displays on Windows is how tiny some user interface elements can be when you load older programs that were designed for the standard 72 pixels per inch pixel density that most displays have used for many decades. When Apple started using high-DPI (HiDPI) displays with many more smaller pixels crammed into the same area, they implemented a work-around in the operating system that would automatically pixel-double old programs that were not updated to adjust themselves automatically to the higher pixel density. That works pretty well except of course some interface elements might look pixelated or jaggy, but at least you can see them and understand what they are.
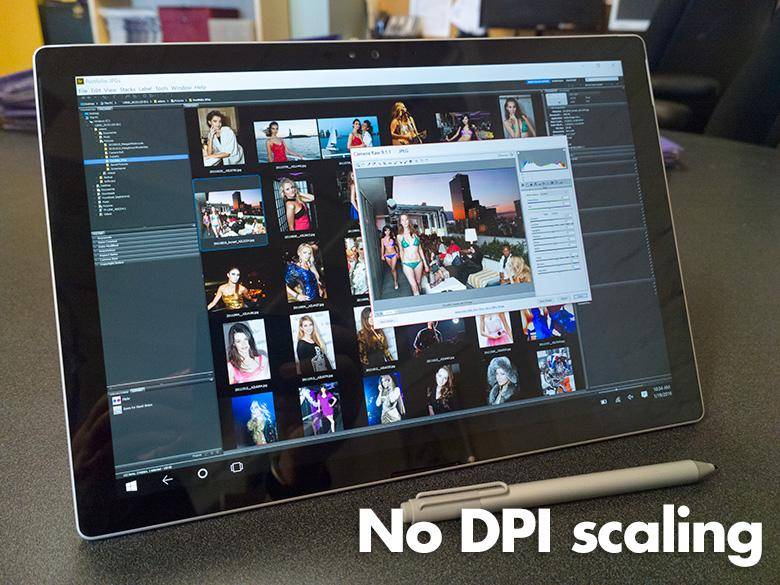
Microsoft didn't implement anything like that on Windows. That means if the app or program doesn't know how to scale for high-DPI displays, then you're out of luck and it will display pixel for pixel. With a 300 dpi pixel density, those UI designs made for 72 pixel per inch displays would shrink so that every normal inch of that interface would now fit into about a quarter of an inch on your screen. That's a huge decrease in readability and usability since buttons and type would become so much smaller! You can see an example of how this looks in the photo above showing Adobe Bridge CS6 and Adobe Camera Raw loaded on a Surface Pro 4. The type and buttons are so small, they're practically unreadable.
Today, many existing programs have been updated with APIs that allow them to properly scale their interface designs to maintain usability on high-DPI displays. However, many still do not. Or maybe you don't want to buy the updated version just to make its buttons bigger. Here's a trick that might work for you. It's been around for a while, but many people still don't know about this hack and are still frustrated by tiny text and buttons on their new PCs with HiDPI displays.

In the above picture, I've forced the Adobe Bridge CS6 software to scale up for the high-DPI screen on the Surface Pro 4. It's much easier to use now as everything is easier to see and activate. Keep reading to find out how to do it. By the way, this tip comes from "—dash" in the Microsoft Answers forum.
Edit the Registry
Open regedit.exe as an Administrator and navigate to the registry key:
-
HKEY_LOCAL_MACHINE > SOFTWARE > Microsoft > Windows > CurrentVersion > SideBySide - Right-click the right pane and choose NEW > DWORD (32 bit) Value.
- Type PreferExternalManifest , and then press ENTER.
- Right-click PreferExternalManifest, and then click Modify.
- Enter Value Data 1 and select Decimal.
- Click OK.
- Exit Registry Editor.
Create Manifest file
The next step is to create a new text file with the name of the program's executable followed by ".manifest" at the end. You're going to place this file in the same directory as the executable file that you want to force DPI scaling on. So for example, if you want "Bridge.exe" to scale, you'll make a text file called "Bridge.exe.manifest". Then you'll want to copy and paste the entire contents of the below XML code into the manifest file and save it.
<assembly xmlns="urn:schemas-microsoft-com:asm.v1" manifestversion="1.0" xmlns:asmv3="urn:schemas-microsoft-com:asm.v3"><dependency><dependentassembly><assemblyidentity type="win32" name="Microsoft.Windows.Common-Controls" version="6.0.0.0" processorarchitecture="*" publickeytoken="6595b64144ccf1df" language="*"></assemblyidentity></dependentassembly></dependency><dependency><dependentassembly><assemblyidentity type="win32" name="Microsoft.VC90.CRT" version="9.0.21022.8" processorarchitecture="amd64" publickeytoken="1fc8b3b9a1e18e3b"></assemblyidentity></dependentassembly></dependency><trustinfo xmlns="urn:schemas-microsoft-com:asm.v3"><security><requestedprivileges><requestedexecutionlevel level="asInvoker" uiaccess="false"></requestedexecutionlevel></requestedprivileges></security></trustinfo><application><windowssettings xmlns="http://schemas.microsoft.com/SMI/2005/WindowsSettings"><dpiaware xmlns:ms_windowssettings="http://schemas.microsoft.com/SMI/2005/WindowsSettings">false</dpiaware></windowssettings></application></assembly>
You can also copy the Manifest file code from here if that's easier.
Now after all of that is done, launch the program and it should now be scaling according to your system's DPI scaling settings. Of course, the UI elements will probably look pixelated, but at least you'll be able to see the buttons and read the text. Be forwarned however that this does not work with everything. Some programs may have errors in which case all you have to do is remove the manifest file from that program's folder. This is probably why the automatic scaling of all programs was not enabled on a system-wide basis like Apple has done.
Are you using a Windows device with a high DPI display? Which programs do you use that still don't scale properly?